Weedless Garden Plot Assembly


Weedless Garden Plot Assembly
Before you begin! Do not remove plug material from perforated planting holes until installation is complete and you have decided where to place your plants. Save/store all perforated holes for later use by placing them in holes not utilized in alternate plantings.
Raised Bed Directions
Materials/Tools Required
(2) Treated 4x4's cut to length 104 inches (not supplied)
(3) Treated 4x4's cut to length 54 inches (not supplied)
(36) Wood screws (not supplied)
(6) Corner brackets (not supplied)
(1) Power drill (not supplied)
Instructions
1. Layout treated 4x4's as shown in the diagram at right, Figure 1.
2. Position the (6) Corner Brackets and screw in place with the (36) Wood Screws provided.
3. Place assembled plot in the area where you want to grow your garden.
4. Fill areas with your soil/compost mix.
5. Place Weedless Garden Plot mat over the large area and center it from side to side
6. Your Weedless Garden Plot installation is now complete and ready for planting. Figure 2 shows the completed installation of Garden Plot with 8” spacing between pre-cut holes.
Ground Installation
Materials/Tools Required
(10) U-stakes (not supplied)
(1) 4' 6” x 6' WeedEnder Mat
(1) Hammer (not supplied)
(1) Nail or Phillips Head Screwdriver (not supplied)
Instructions
1. For new garden sites, prepare the 4' 6” x 6' area by tilling up the soil and removing all debris and large clumps of weeds and grass. If using an existing garden bed site, clean up the area thoroughly as required.
2. Supplement area with your soil/compost mix if needed.
3. Place WeedEnder mat over the prepared area.
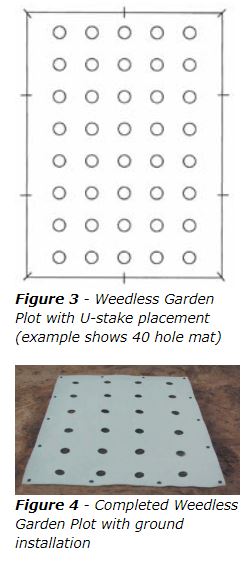
4. With the WeedEnder in place, create pilot holes in the material with a nail or phillips head screwdriver. Start in the corners and then proceed to create holes at 18 in. intervals along the mat's edge. Figure 3 shows the general stake placement. Gently hammer the U-stakes through the pilot holes, one side of the stake at a time (so as not to bend the stakes).
5. Your Weedless Garden Plot installation is now complete and ready for planting. Figure 4 shows the completed installation of the Weedless Garden Plot with pre-cut holes.
Note: Plug any hole that is not being used for planting. Another suggestion is to place a flower in any vacant hole. It will add color and fragrance while enhancing the overall beauty of your garden plot.


