


Weedless Garden Roll Assembly
![]()
Weedless Garden Roll Assembly
This kit contains:
Weedless Garden Roll
U-stakes
New Bed Ground Installation
Materials/Tools Required
Weedless Garden Roll
U-stakes
Hammer (not supplied)
Box Cutter or Sharp Knife (not supplied)
Instructions
1. For new garden sites, prepare the chosen area by tilling up the soil and removing all debris and large clumps of weeds and grass. If using an existing garden bed site, clean up the area thoroughly as required.
2. Supplement area with your soil/compost mix if needed.
3. Cut the WeedEnder mat to the desired size.
4. Place WeedEnder mat over the prepared area.
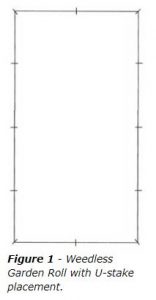
5. With the WeedEnder in place, create pilot holes in the material with a nail or phillips head screwdriver. Start in the corners and then proceed to create holes at 18 in. intervals along the materials's edge. Figure 1 shows the general stake placement. Gently hammer the U-stakes through the pilot holes, one side of the stake at a time (so as not to bend the stakes).
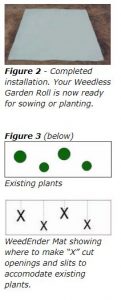
6. Your Weedless Garden Roll installation is now complete and ready for planting. Figure 2 shows the completed installation of the Weedless Garden Roll. Now you are ready to cut openings for your plants and begin gardening.
Existing Bed Ground Installation
Materials/Tools Required
Weedless Garden Roll
U-stakes
Hammer (not supplied)
Box Cutter or Sharp Knife (not supplied)
Instructions
1. Unroll the roll of WeedEnder and place on the ground in front of existing bed of trees and/or shrubs. Measure the distance from the front edge of bed to the center location of the existing tree/shrub. Use this measurement to cut an “X” in the same location on the WeedEnder roll, which will represent the existing tree/shrub location. Cut a slit from the center of this “X” away from you so the slit, when placed, will be behind the tree/shrub, making for a neater finished appearance. (See Figure 3)
2. After opening the slit at each existing tree/shrub, slide the WeedEnder roll from front of bed to back. Make adjustments to “X's” cut for existing tree/shrubs if necessary. The WeedEnder roll should lay flat on the ground throughout the bed. It is recommended that the points of each flap on the “X” be folded under the WeedEnder material at the base of each tree/shrub or, if you prefer, you can cut the points off entirely.
3. You should now tack down the roll on the outside edges, starting with the corners and then approximately every 18 inches. Next, you will need to secure the slits that are coming from each tree/shrub by placing one U stake on either end of the slit (one at base of tree/shrub, one at outer edge of roll) so it will hold material in position. Now place U stakes approximately every 4 inches across entire length of the seam.
Note: This product does not include enough U-stakes to reclose slits made to accomodate existing plants. Additional U-stakes may be purchased by calling (910) 323-5311.